The Playlist page is where you view the currently loaded Playlist.
A Playlist is a collection of Presets with controls dictating whether they should be played one after another or individually, whether to automate tempo changes, etc.
You can have as many Playlists as you like. They are managed in the Playlist Manager.
A good way to get familiar with the things Playlists can do is to view some of the Example Playlists. You can install those by going to Playlist Manager, tapping the menu button and choosing “Example Playlists”. Tap Here to be guided.
Sections
You can think of the Playlist page as consisting of 5 sections…
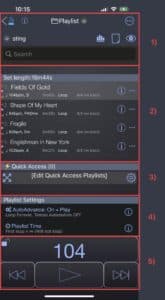
1) Playlist Menu Section
2) Playlist Items
3) Quick Access
4) Playlist Settings
5) Playlist Transport Controls
Let’s take a look at each section.
1) Playlist Menu Section
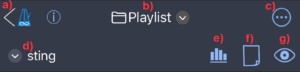
a) Sequencer button: Tap to view the Sequencer page. You can also just swipe to the right as the main Sequencer is always just to the left of this page.
b) Page button: Tap this button to switch between Presets, Playlist, Playlist Manager and Goals pages.
c) Menu button: Tap to Edit, Search, or Add to Items in the Playlist. In Edit mode, you can select multiple items and perform actions on them with the Actions button that will appear at the bottom of the Playlist page.
d) Playlist name menu: Perform actions on the Playlist such as renaming, changing sounds for all items, shuffling the order, printing a PDF.
e) Practice Log Button: Tap to view the Practice Log for the loaded Playlist.
f) Playlist Notes: Tap to add notes for the Playlist, or to view existing notes.
g) Eye Notes button: Tap to view notes associated with the currently loaded Playlist Item.
Playlist Edit Mode
Tap the Playlist menu button and choose “Edit” to enter edit mode.
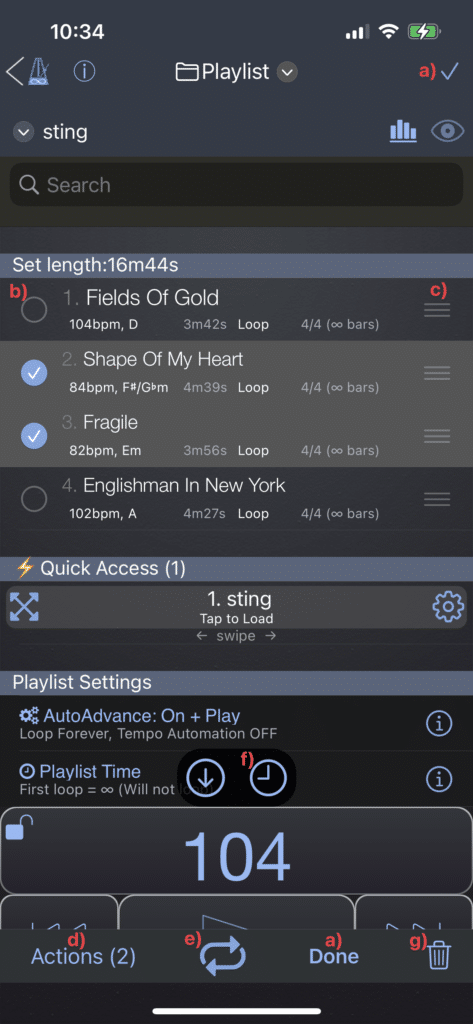
a) Done: Exit edit mode.
b) Select indicator: Tap items to toggle selection.
c) Drag Handles: Use handles to rearrange items.
d) Actions Button: Tap the Actions button for actions to perform on the selected items. For example, you can select the items in the order that you want them to be, then choose Arrange from the Actions menu. There are many actions to chose from.
e) Solo: Solo the selected items. In AutoAdvance mode, only the selected items will be played.
f) Quick Set: Quickly set Reps/Timer/Tempo for selected items.
g) Delete: Note: If the items were added from the Presets library, deleting here won’t affect the originals. It simply deletes the instance in the Playlist.
2)Playlist Items
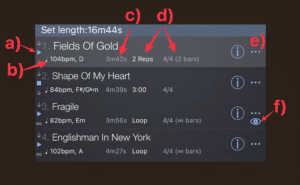
Each row in a Playlist has a name, tempo, rep/timer value, time sig and length in bars of the pattern (taking into account the rep value) and a menu button to modify some of these items.
a) Play/Stop/Skip when reached indicator: These symbols appear when Auto Advance and Play When Advancing are turned on in Playlist Controls. A Play symbol indicates that the item will play when reached. A stop symbol indicates it will stop when reached, and a blue down arrow indicates it will Skip when reached. The Skip when reached option is often used for a Count In item, meaning you can start playback from the Count In and have it count you in to the next item, but when the Playlist loops, the count in will be skipped.
b) Tempo (and key): This indicates the tempo of the current item and the song key (if the item was added using the Song Lookup feature). TIP: You can tap the padlock icon on the tempo at the bottom of the page to turn on Tempo Lock. This overrides the individual tempos of the items in the playlist meaning you can change them all at once.
c) Song Duration: This indicates the duration of the song if it was added using the Song Lookup feature, or if you set a Song Length on a Preset. This is simply used to calculate the length of the setlist and has no effect on how long the preset will play for.
d) Rep/Timer: This indicates how many reps or how much time the item will play for. When the value is reached PolyNome will either stop, or move onto the next item in the list depending on the settings in Playlist Controls. Tap the menu button on the right (or long press the item) to modify these settings.
e) Menu button: Tap this to edit features of the item. You can also long press on the item.
f) Eye Notes indicator: When this is blue it means the original Preset has notes. When it’s red it means the item has overridden notes (add notes by tapping the Menu button and choosing Settings from the very bottom of the menu). To view the notes tap the Eye Button at the top of the Playlist page.
Eye Notes Font Size
Tapping the Eye Notes button (item ‘g)’ in list at the top of the page) brings up the Eye Notes viewer. This is a black panel which displays notes associated with the current Playlist item.
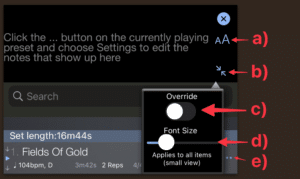
a) Font Size button: Tapping this brings up the Font Size selector. You can set the font size using the slider. Note that the Eye Notes viewer can be in a minimised state (as in the image above) and a maximised state (where it takes up most of the screen). You can set different font sizes for each state.
b) Display Size: Use this button to switch between minimised view (shown), maximised view (where the eye notes take up most of the screen), and Auto Maximise (where the notes viewer jumps to maximised view when playing, and back to minimised view when stopped)
c) Override button: When this is on the selected font size will apply only to the item that is currently selected. This means you can customise the font size for each item in the playlist to allow the notes to be the exact size you require. When the button is off you’re changing the font size for all items that don’t have override turned on.
d) Font size slider: Use this slider to modify the font size. The changes will be saved when you tap outside the pop up menu and it disappears.
e) Menu button: Tap this and choose “Settings” from the bottom of the menu to set notes for a Playlist item.
3) Quick Access
The Quick Access row can be populated with Playlists from Playlist Manager. This allows you to quickly load them without needing to return to Playlist Manager.
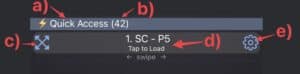
a) Name of the loaded Quick Access: The flash image on the left indicates that it’s a Quick Access Playlist. If it says “Quick Access” this is the default Quick Access which you can use for temporary storage of Playlists you want to quickly load.
b) Number of Playlists in this Quick Access.
c) Expand/Edit button: Tap this to load the contents of the Quick Access into the Playlist space. This allows you to rearrange items or add/remove items.
d) Playlist Link: Tap this to load the playlist. Swipe left/right to view other playlists in the Quick Access.
e) Gear Button: Tap this to create or load Quick Access Playlists. If the currently loaded Playlist contains links to other playlists, you can also tap this to use those links as the main Quick Access.
4) Playlist Settings
At the bottom of the Playlist page you’ll find the Playlist Settings and Playlist Time rows.
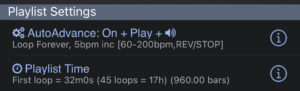
AutoAdvance
The AutoAdvance row shows the current settings for the Playlist. In the image above, you can see that the Playlist is set to loop forever, increase the tempo by 5bpm each time it loops, with tempo boundaries of 60 and 200bpm with an action of REV/STOP.
The tempo boundaries in this example mean that when 200bpm is reached, the tempo will start decreasing by 5pm each loop until the min boundary of 60bpm is reached, at which point playback will stop. That’s what the REV/STOP means.
You can modify these settings by tapping the AutoAdvance row.
Playlist Time
The Playlist Time row shows some stats for the current playlist. In the example image above, the first loop of the playlist will take 32mins. With the loop and tempo change settings, it’ll need 45 loops to complete the cycle, which will take 17 hours!! That’s quite a practice routine.
Tapping on the Playlist Time row will give you quick options to set Tempos/Reps/Timers for all items in the playlist. It also gives options to set a total practice time (in this case, you could choose 1 hour and it would reduce the playback time of each item to fit your routine into 1 hour)
Find out more by tapping the ⓘ button on either row.
5) Playlist Transport Controls
At the bottom of the Playlist Page you’ll find the transport controls. These can be customised per Playlist by tapping and holding the Play button to bring up the Button Picker (also shown)
![]()
a) Tempo Tweak buttons: Use these to increment/decrement the tempo. TIP: In the PolyNome Preferences menu you can customise what these buttons do.
b) Tempo Lock: Tap the padlock to disable individual tempos for Playlist items and use a global tempo. This is useful for playlists where every item should be the same tempo.
c) Tempo Display: Tap the tempo to bring up the Quick Tempo Entry page and set the tempo for the current Playlist item (or entire Playlist if using Tempo Lock). TIP: If the Playlist is in Edit mode and multiple items are selected, the tempo will be applied to all selected items.
d) Tempo Percentage slider: Use this to modify the tempo of all items in the Playlist by a certain percentage. This is useful if you have a Playlist that represents different sections of a song and the tempos are related. If you want to play the song a bit faster or slower you’ll want to make the modifications using the slider so the changes are relative. NOTE: This is not shown by default. You need to long press the Play button and turn on Tempo %
e) Previous/Next buttons: Tap these to move backwards and forwards through the items in the Playlist.
f) Play button: Tap to stop/start. Tap and hold to bring up Button Picker.
g) Mute button: Tap this to mute the system volume (not shown by default. Enable it by long pressing the Play button and turning on Mute)
h) Button Picker: Tap and hold the Play button to bring up the Button Picker. Here you can choose which buttons to display in the current Playlist, and you can change the size of them with the slider. For example, a Playlist for a gig setlist may already have the correct tempos set, so you can turn off the tempo buttons and just have large Play and Prev/Next buttons. NOTE: The configuration of buttons is stored per Playlist